
Travel vlogs are the passport to storytelling in the modern era, letting you take the audience along for a show-and-tell with sunset, street market, and mountain trek. A cinematic vlog doesn’t just show a place- it makes a viewer feel it and stirs the wanderlust with every frame. High-end gear or professional skills aren’t needed to pull it off. CapCut’s desktop video editor is a free, flexible tool for transforming raw footage from the road into polished masterpieces- ideal for the penny-pinching creator. It’s like painting a postcard: with the right colors and strokes, your trip is entrancing.
CapCut’s text to speech feature adds robust narration to your video footage, showing city buzz or mountain serenity without having to record live. This introductory guide will show you how to use CapCut’s desktop editor to create travel vlogs that carry a cinematic touch to stand out on YouTube, Instagram, or TikTok. Follow the steps, every one of them, and you’ll find that all of your adventures will come alive as videos that will make an impression come April 2025’s travel-hungry digital landscape.
Why Cinematic Travel Vlogs Shine
Today, travel vlogs are very much in vogue as most of the viewers watch for inspiration; they’ve been known to boost shares by as much as 50 percent. But how do you create such immersive videos without spending money and yet remain beneficial to creators chasing views or memories? CapCut’s desktop editor can help.
It Can Evoke Emotion
Because CapCut’s effects produce scenes that almost literally make the heart stir, a well-edited vlog experience is like a journey and not like a series of slideshows.
It’s also a good way to get more followers
Cinematic qualities keep viewers glued longer and then hook potential followers. With CapCut, creating pro-level content, and making them come back again becomes easy.
Sparking Creativity with CapCut’s AI Video Generator
Are you pressed for time to edit after a trip? The CapCut AI video generator is your shortcut through creativity; enter a prompt like “Epic 60-second montage of a beach getaway,” and it builds a video with sweeping visuals, music, and transitions. Fastest way to the magic in your vlog.
Quick Cinematic Drafts-
A beautifully carved AI clip that drags itself like a drone or lively cuts, suitable for Instagram Reels or YouTube intros.
Customizing Your Journey
Alter the AI draft in CapCut to add your footage, making the vlog stand out as your very own travel story.
Setting the Mood with CapCut’s Voice Changer
CapCut makes your vlog come alive with audio, and it has a voice changer that lets you create a mood that matches your adventure. Breathe life into narration to sound more dreamy for a coastal escape or bolder for a sprint through the city walk, just like a soundtrack for the scene.
Deeper Story
A “calm” voice effect adds the serenity of a forest trek by drawing the viewer into the moment.
Matching Travel Energy
Use an “Adventurous” take for hiking vlogging where every word jolts with excitement.
Three easy steps to create a Travel Vlog with CapCut Desktop Editor
Making a travel video essentially captures your destination through sight, sound, and storytelling to transport an audience to that place, bringing it to life through CapCut’s desktop editor. CapCut’s editor makes all this seamless transporting unedited footage into mini-movie-style videos for you, even if you have little experience editing videos. It doesn’t matter whether you are capturing a weekend getaway or a long-distance adventure- your workflow will bring you from tentative clicking to a share-ready log, including all the simple steps in ensuring that our adventure becomes brighter in 2025’s content-filled feeds.
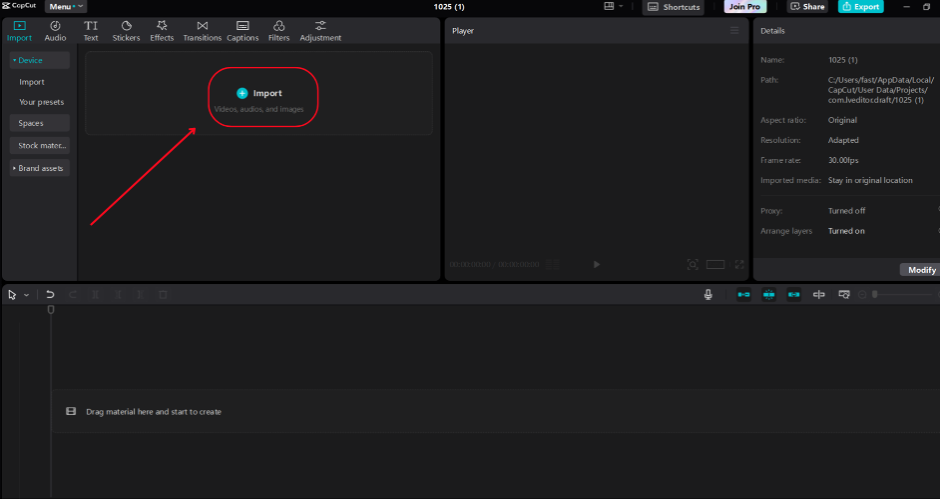
1. Import your video
Download CapCut’s desktop editor from its official site and install it on your Windows or Mac- launch it. Click “New Project” on the welcome screen to begin a fresh canvas where you will work on your vlog. Import your materials by going to “Import” on the top-left panel, uploading video clips (like market strolls or scenic views), photographs (e.g., a sunset still), and a royalty-free music track, drag them below to the timeline.
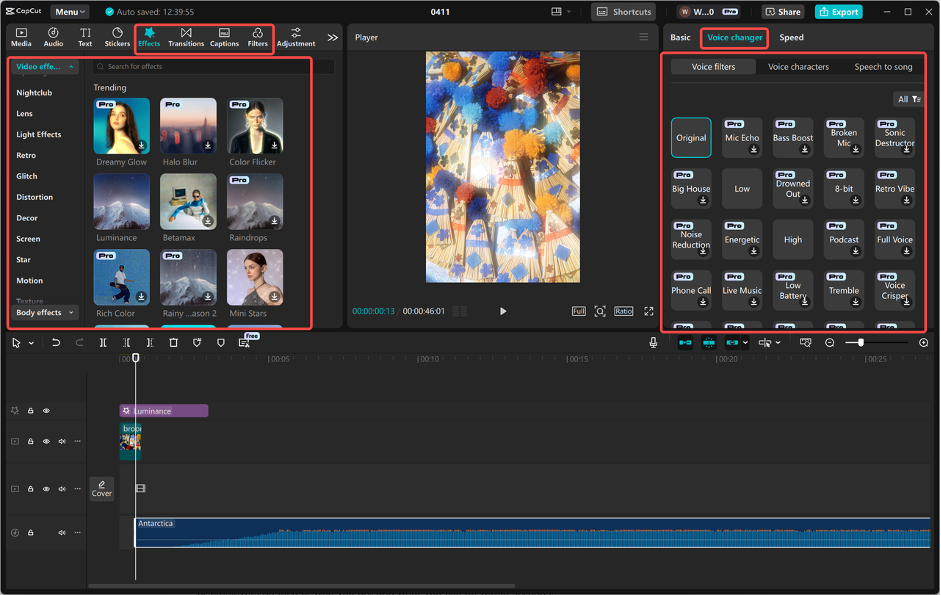
2. Customize your video
Choose ”Text” on the left, select “Text-to-Speech,” fill in something like, “This city stole my heart,” choose one voice such as “Dreamy”, to feel immersed in the fantasy, and click “Generate” drag audio to open it with the initial scene, adjust the sound to merge with music, and preview for smooth flow.
Type in a prompt such as “Cinematic 60-second travel montage for a mountain trip,” and let CapCut create a draft-customize further through “Effects” (like color grades for a golden hour) to feel the mood. Adjust the cuts to feel as if they didn’t change “the way they should.” Select the narration track; click “Audio” on the top menu; then select “Voice Changer.
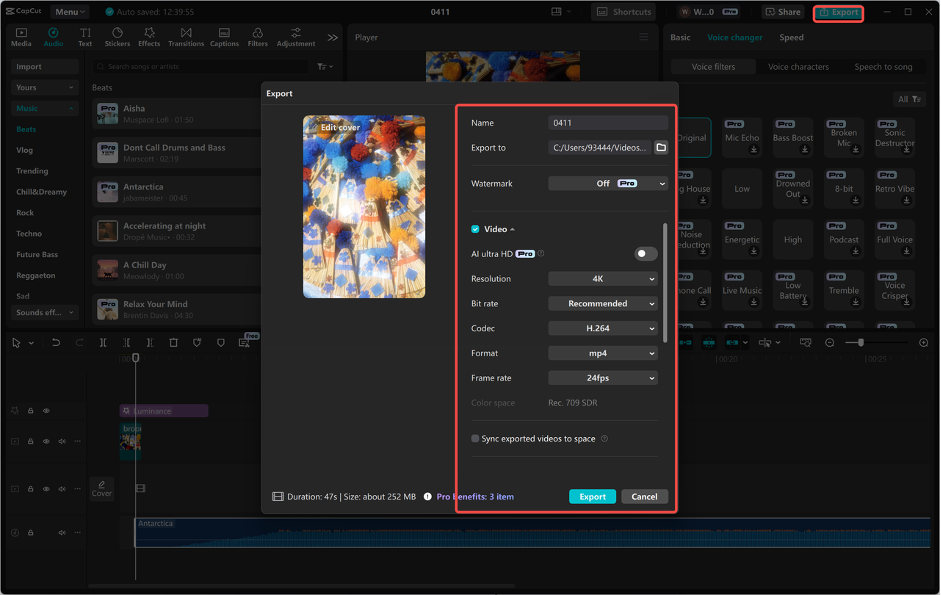
3. Export your video
You can preview your video when done with the play button above the timeline. Utility at pace applies to hitting a beautiful sweet spot of about 2 minutes for this, and finally, you click “Export” in the top-right, choosing 1080p at 60fps for crisp quality-save it to your device, ready to be posted on YouTube, Instagram, or TikTok.
Tips for Cinematic Travel Vlogs with CapCut
Attractively Hook: Hit them with your best shot effects in CapCut to make it pop instantly.
Story: Arrange your clips like a journey, applying CapCut every step of the way.
Mood Match: Get the music and voice to flow with your vibe; that’s easy with CapCut tools.
Engaging Fans: Spark comments by adding text CTAs such as, “Where next?” Done easily in CapCut.
Conclusion
CapCut desktop editor is the key to making stunning travel vlogs in 2025, with text-to-speech, AI video generator, and voice-changer tools turning raw footage into soul-stirring narratives of inspiration. Refer to this guide for creating videos that will transport the viewer away and help grow your channel. Download CapCut and start sharing your journeys!